Distributed API Rate Limiter
Get started
জয় শ্রী রাম
🕉What is Rate Limiting?
Imagine that a Distributed Denial of Service (DDOS) attack has been started to your server by an attacker. What can you do? Your API will not be available for users. Why? A DDOS attack can send a ton of requests to your API in a second, and the API can’t handle these requests. We can overcome this issue with auto-scaling. Auto-scaling might be costly, and in this scenario, the above requests were from an attack and not the real customer requests. So auto-scaling won't be a viable solution since the newly provisoned instances will also be victims of DDOS. We can use a mechanism to limit the rate at which requests are made to avoid the server. We call this feature as rate-limiting. Rate limiting is the easiest way to prevent server overloading. More than that, rate-limiting can be used to give an excellent customer experience and commercial use of APIs.
Rate Limiting is important to preventing malicious attacks on your APIs. That's why lack of resources is one of OWASP’s top API risks.
Rate limiting applies to the number of calls a user can make to an API within a set time frame. This is used to help control the load that’s put on the system.
Rate limiting helps prevent a user from exhausting the system’s resources. Without rate limiting, it’s easier for a malicious party to overwhelm the system. This is done when the system is flooded with requests for information, thereby consuming memory, storage, and network capacity.
An API that utilizes rate limiting may throttle clients that attempt to make too many calls or temporarily block them altogether. Users who have been throttled may either have their requests denied or slowed down for a set time. This will allow legitimate requests to still be fulfilled without slowing down the entire application.
API responds with HTTP Status Code 429 Too Many Requestswhen a request is rate limited or throttled.
Using Rate Limiter we can enforce
policies as below:
-
A maximum of 20 accounts are allowed to be created per day from a unique source IP address.
This helps minimizing spams or malicious accounts creation, and Denial of Service (DoS) and Distributed Denial of Service (DDoS).
-
Devices are allowed 5 failed credit card transactions per day.
- Users may only send 1 message per day with risky keywords.
Use Cases: Why do we need Rate Limiter?
Prevent Brute Force Attacks:
One of the most common use cases for rate limiting is to block brute force attacks. In a brute force attack, a hacker uses automation to send an endless stream of requests to an API, hoping that eventually one may be accepted. Limiting client access will slow down this attack. At the same time, the receiving system should notice the unexpectedly large number of failed requests and generate alerts so that further action may be taken.
In some cases, a user may accidentally cause a brute attack—a bug may cause repeated failed requests, causing the client to keep trying. Rate limiting would help to force a temporary stop and allow for follow-up action.
Prevent Denial of Service Attacks:
Another use case is to prevent a Denial of Service (DoS) attack. DoS attacks occur when a user attempts to slow or shut down an application completely. The user may do this by flooding the API with requests. Multiple users may attempt to overwhelm the system in this way as well; this is known as a Distributed Denial of Service (DDoS) attack.
Preventing resource starvation:
The most common reason for rate limiting is to improve the availability of API-based services by avoiding resource starvation. Many load-based denial-of-service incidents in large systems are unintentional—caused by errors in software or configurations in some other part of the system—not malicious attacks (such as network-based distributed denial of service attacks). Resource starvation that isn't caused by a malicious attack is sometimes referred to as friendly-fire denial of service (DoS).
Generally, a service applies rate limiting at a step before the constrained resource, with some advanced-warning safety margin. Margin is required because there can be some lag in loads, and the protection of rate limiting needs to be in place before critical contention for a resource happens. For example, a RESTful API might apply rate limiting to protect an underlying database; without rate limiting, a scalable API service could make large numbers of calls to the database concurrently, and the database might not be able to send clear rate-limiting signals.
Pevent Cascading Failures:
Rate limiting is generally put in place as a defensive measure for services. Shared services need to protect themselves from excessive use—whether intended or unintended—to maintain service availability. Even highly scalable systems should have limits on consumption at some level. For the system to perform well, clients must also be designed with rate limiting in mind to reduce the chances of
cascading failure.
Rate limiting on both the client side and the server side is crucial for maximizing throughput and minimizing end-to-end latency across large distributed systems.
What is Throttling?
Rate Limiting is a process that is used to define the rate and speed at which consumers can access APIs. Throttling is the process of controlling the usage of the APIs by customers during a given period. Throttling can be defined at the application level and/or API level. When a throttle limit is crossed, the server returns HTTP status “429 - Too many requests".
What Are the Major Types of Rate Limiting?
There are several major types of rate limiting models that a business can choose between depending on which one offers the best fit for a business based on the nature of the web services that they offer, as we will explore in greater detail below.
-
User-Level Rate Limiting
In cases where a system can uniquely identify a user, it can restrict the number of API requests that a user makes in a time period. For example, if the user is only allowed to make two requests per second, the system denies the user’s third request made in the same second. User-level rate limiting ensures fair usage. However, maintaining the usage statistics of each user can create an overhead to the system that if not required for other reasons, could be a drain on resources.
-
Server-Level Rate Limiting
Most API-based services are distributed in nature. That means when a user sends a request, it might be serviced by any one of the many servers. In distributed systems, rate limiting can be used for load-sharing among servers. For example, if one server receives a large chunk of requests out of ten servers in a distributed system and others are mostly idle, the system is not fully utilized. There will be a restriction on the number of service requests that a particular server can handle in server-level rate limiting. If a server receives requests that are over this set limit, they are either dropped or routed to another server. Server-level rate limiting ensures the system’s availability and prevents denial of service attacks targeted at a particular server.
-
Geography-Based Rate Limiting
Most API-based services have servers spread across the globe. When a user issues an API request, a server close to the user’s geographic location fulfils it. Organizations implement geography-based rate limiting to restrict the number of service requests from a particular geographic area. This can also be done based on timing. For example, if the number of requests coming from a particular geographic location is small from 1:00 am to 6:00 am, then a web server can have a rate limiting rule for this particular period. If there is an attack on the server during these hours, the number of requests will spike. In the event of a spike, the rate limiting mechanism will then trigger an alert and the organization can quickly respond to such an attack.
Client-side strategies
The strategies described so far apply to rate limiting on the server side. However, these strategies can inform the design of clients, especially when you consider that many components in a distributed system are both client and server.Just as a service's primary purpose in using rate limiting is to protect itself and maintain availability, a client's primary purpose is to fulfill the request it is making to a service. A service might be unable to fulfill a request from a client for a variety of reasons, including the following:
- The service is unreachable because of network conditions.
- The service returned a non-specific error.
- The service denies the request because of an authentication or authorization failure.
- The client request is invalid or malformed.
- The service rate-limits the caller and sends a backpressure signal (commonly a 429 response).
In response to rate-limiting, intermittent, or non-specific errors, a client should generally retry the request after a delay. It is a best practice for this delay to increase exponentially after each failed request, which is referred to as exponential backoff. When many clients might be making schedule-based requests (such as fetching results every hour), additional random time (jitter) should be applied to the request timing, the backoff period, or both to ensure that these multiple client instances don't become periodic thundering herd, and themselves cause a form of DDoS.
Imagine a mobile app with many users that checks in with an API at exactly noon every day, and applies the same deterministic back-off logic. At noon, many clients call the service, which starts rate limiting and returning responses with a 429 Too Many Requests status code. The clients then dutifully back off and wait a set amount of time (deterministic delay) of exactly 60 seconds, and then at 12:01 the service receives another large set of requests. By adding a random offset (jitter) to the time of the initial request or to the delay time, the requests and retries can be more evenly distributed, giving the service a better chance of fulfilling the requests.
Ideally, non-idempotent requests can be made in the context of a strongly consistent transaction, but not all service requests can offer such guarantees, and so retries that mutate data need to consider the consequences of duplicate action.
For situations in which the client developer knows that the system that they are calling is not resilient to stressful loads and does not support rate-limiting signals (back-pressure), the client library developer or client application developer can choose to apply self-imposed throttling, using the same techniques for enforcing rate limits that can be used on the server side. These techniques are discussed below in the algorithms section.
For clients of APIs that defer the response with an asynchronous long-running operation ID, the client can choose to enter a blocking loop polling the status of the deferred response, removing this complexity from the user of the client library.
What Are the Algorithms Used for Rate Limiting?
In general, a rate is a simple count of occurrences over time. However, there are several different techniques for measuring and limiting rates, each with their own uses and implications.Below are the common rate limiting algorithms. We will now discuss each of these algorithms in great details.
-
Token Bucket algorithm
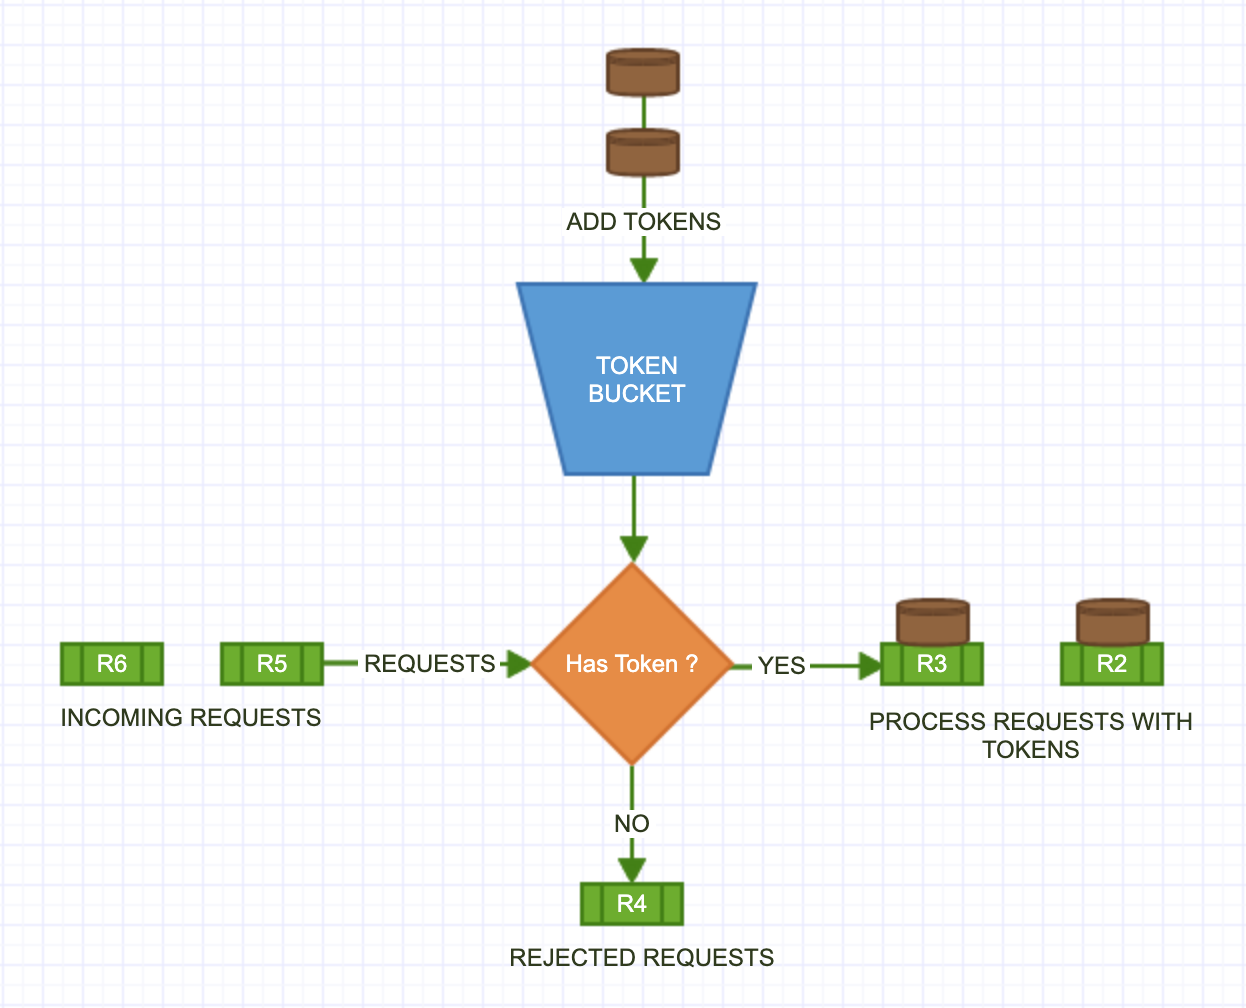
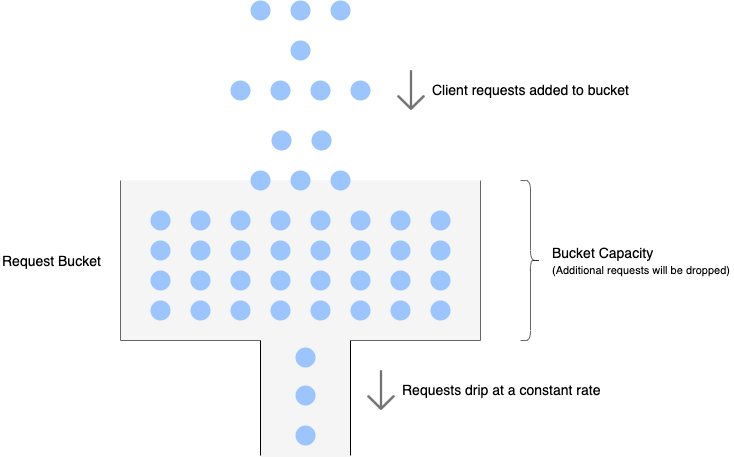
The Token Bucket throttling algorithm works as follows: A token bucket is a container that has pre-defined capacity. Tokens are put in the bucket at preset rates periodically. Once the bucket is full, no more tokens are added.
In the example below, the bucket has maximum capacity of 4. So the bucket will be hold a maximum of 4 tokens at any given time. The Refiller puts 2 tokens per second in the container. At any point of time of the bucket becomes full, i.e. reaches its maximum capacity, then extra tokens will overflow.
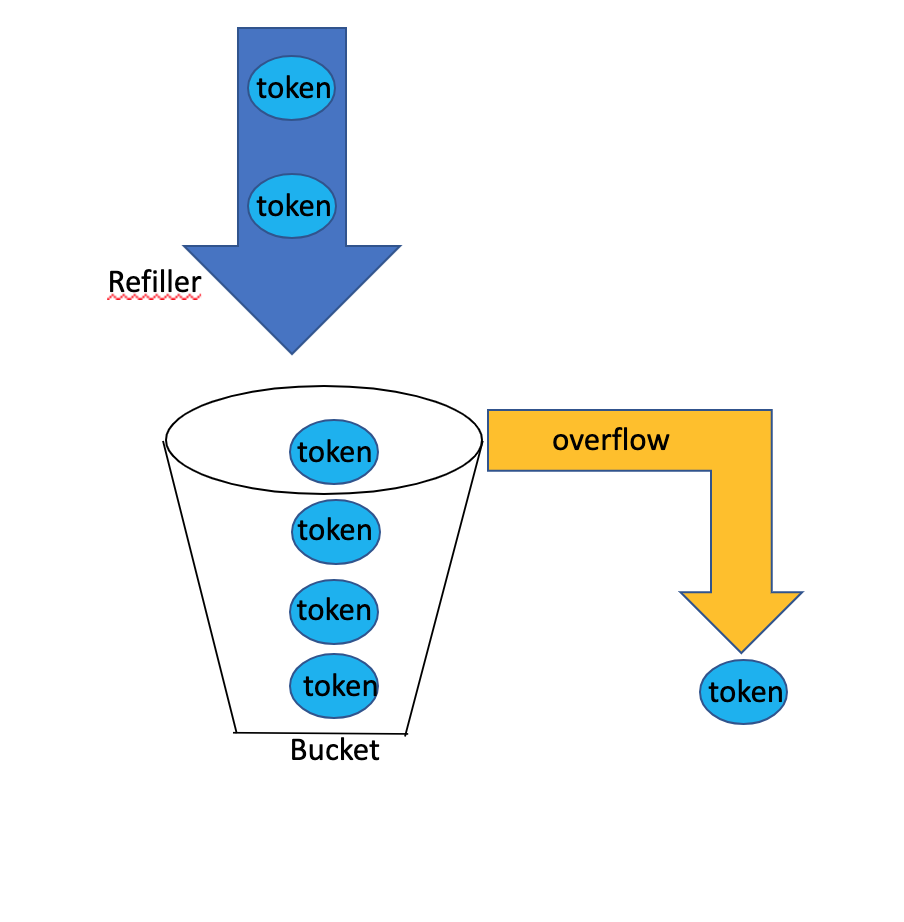
As you can already understand, that we are implementing rate limiting or throttling mechanishm for an API using a bucket or container and tokens.
Each API request consumes one token. When a request arrives, we check if there is at least one token left in the bucket. If there is, we take one token out of the bucket, and the request goes through. If the the bucket is empty, the request is dropped. This is illustrated in below doagram.
Example:
-
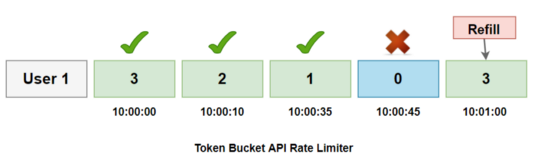
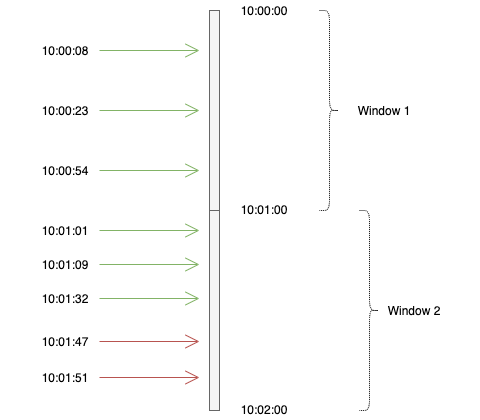
In the below example, there is a limit of 3 requests per minute per user.
-
User 1 makes the first request at 10:00:00; the available token
is 3, therefore the request is approved, and the available token count is reduced to 2.
-
At 10:00:10, the user’s second request, the available token is 2,
the request is permitted, and the token count is decremented to 1.
-
The third request arrives at 10:00:35, with token
count 1 available, therefore the request is granted and decremented.
-
The 4th request will arrive at 10:00:45, and the
available count is already zero, hence API is denied.
-
Now, at 10:01:00, the count will be refreshed with the available token 3 for the third time.
Token buckets with customizable refill amounts let you express more complex rate limits like:-
Each user account is allowed a maximum of 10 failed logins per hour, which refill at a rate of 1 login per hour.
- Each geocoded shipping address is allowed a maximum of $200 worth of purchases per day from mail.ru email addresses, which refills at a rate of $50 per day.
As you can see, these rate limits allow a lot of freedom for legitimate user behavior, but quickly clamp down on repeated violations.
Implementation of Token Bucket algorithm
Each bucket has a few properties:-
key
a unique byte string that identifies the bucket
-
maxAmount
the maximum number of tokens the bucket can hold
-
refillTime
the amount of time between refills
-
refillAmount
the number of tokens that are added to the bucket during a refill
-
value
the current number of tokens in the bucket
-
lastUpdate
the last time the bucket was updated
First, if the bucket doesn’t exist, we create it:
bucket.value = bucket.maxAmount
bucket.lastUpdate = now()
Then we refill the bucket if there are any pending refills:
refillCount = floor((now() - bucket.lastUpdate) / bucket.refillTime)
bucket.value = min(
    bucket.maxAmount,
    bucket.value + refillCount * bucket.refillAmount
)
bucket.lastUpdate = min(
    now(),
    bucket.lastUpdate + refillCount * bucket.refillTime
)
Next, we check if tokens >= bucket.value and bail out if it is true.
Finally, we take the tokens out of the bucket:
bucket.value -= tokens
Use of In-Memory Cache:
Our algorithm needs to persist below data to operate correctly:
-
user id or client id or tenand id or app key or source ip address or precise geographic location to represent who is sending the API request or making the API call.
-
number of token(s) left for that user/client/tenant
in the bucket
-
timestamp when the request was sent
Keep in mind the rate at which the traffic comes is not in our control, at any point of time we should be prepared to see a burst or spike in traffic. Using a database is not a good idea due to slowness of disk access. In-memory cache is the way to go. Because it is quick and supports a time-based expiration technique, an in-memory cache is chosen. Redis, for example, is a popular choice for rate-limiting. “INCR” and “EXPIRE” are two commands that can be used to access in-memory storage.- INCR: It is used to increase the stored counter by 1.
- EXPIRE: It is used to set a timeout for the counter. The counter is automatically deleted when the timeout expires.
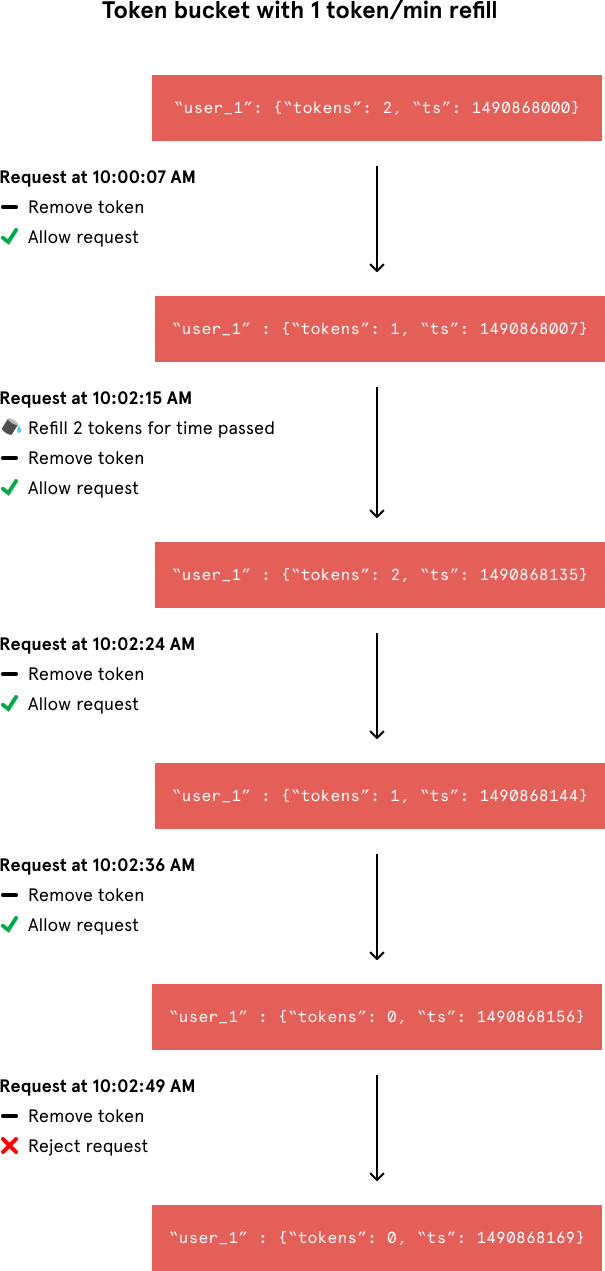
For each unique user, we would record their last request’s Unix timestamp and available token count within a hash in Redis.

User_1 has two tokens left in their token bucket and made their last request on Thursday, March 30, 2017 at 10:00 GMT.Whenever a new request arrives from a user, the rate limiter would have to do a number of things to track usage. It would fetch the entry from Redis and refill the available tokens based on a chosen refill rate and the time of the user’s last request. Then, it would update the entry with the current request’s timestamp and the new available token count. When the available token count drops to zero, the rate limiter knows the user has exceeded the limit.
User_1 has two tokens left in their token bucket and made their last request on Thursday, March 30, 2017 at 10:00 GMT.We can break that algorithm into three steps
-
Fetch the token
-
Access the token
-
Update the token
-
Fetch the token:
So when a request comes from the user, then our rate-limiting algorithm first fetch the user’s token using the user id.
-
Access the token:
When we have enough tokens for the particular user, then it will allow processing otherwise it blocks the request to hit the API. The last access time and remaining tokens of that specific user will be changed.
-
Update Token:
Rate limiting algorithm will update the token in the Redis as well. One more thing, the tokens will be restored after the time interval. In our scenario, ten will be updated after the time period as a token value.
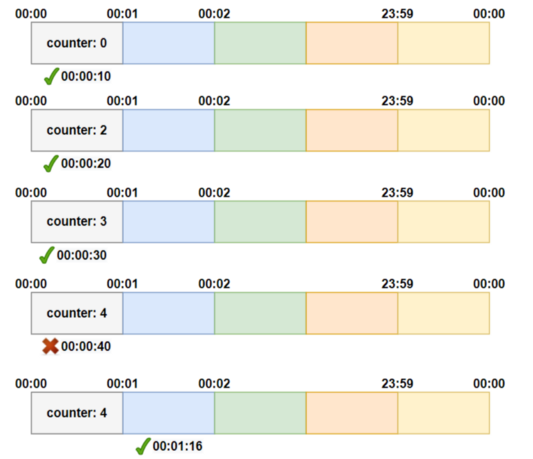
In this algorithm, we maintain a counter which shows how many requests a user has left and time when the counter was reset. For each request a user makes,
-
Check if window time has been elapsed since the last time counter was reset.
For rate 100 requests/min, current time 10:00:27,
last reset time 9:59:00 is not elapsed and 9:59:25 (10:00:27 – 9:59:25 > 60 sec) is elapsed.
-
If window time is not elapsed, check if the user has sufficient requests left to handle the incoming request.
-
If the user has none left, the request is dropped.
-
Otherwise, we decrement the counter by 1 and handle the incoming request.
-
If the window time has been elapsed, i.e., the difference between last time counter was reset and the current time is
greater than the allowed window(60s), we reset the number of requests allowed to allowed limit(100)
// RateLimitUsingTokenBucket .
func RateLimitUsingTokenBucket(
    userID string,
    intervalInSeconds int64,
    maximumRequests int64) bool {

	// userID can be apikey, location, ip
	value, _ := redisClient.Get(ctx, userID+"_last_reset_time").Result()

	lastResetTime, _ := strconv.ParseInt(value, 10, 64)

	// if the key is not available,
    // i.e., this is the first request, lastResetTime will be set to 0
    // and counter be set to max requests allowed
	// check if time window since last counter reset has elapsed
	if time.Now().Unix() - lastResetTime >= intervalInSeconds {
		// if elapsed, reset the counter
		redisClient.Set(ctx, userID+"_counter", strconv.FormatInt(maximumRequests, 10), 0)
	}

    else {
		value, _ := redisClient.Get(ctx, userID+"_counter").Result()

		requestLeft, _ := strconv.ParseInt(value, 10, 64)

		if requestLeft <= 0 { // request left is 0 or < 0
			// drop request
			return false
		}
	}

	// decrement request count by 1
	redisClient.Decr(ctx, userID+"_counter")

	// handle request
	return true
}
Distributed Rate Limiting, Race Condition and Concurrency:
Despite the token bucket algorithm’s elegance and tiny memory footprint, its Redis operations aren’t atomic. In a distributed environment, the “read-and-then-write” behavior creates a race condition, which means the rate limiter can at times be too lenient.
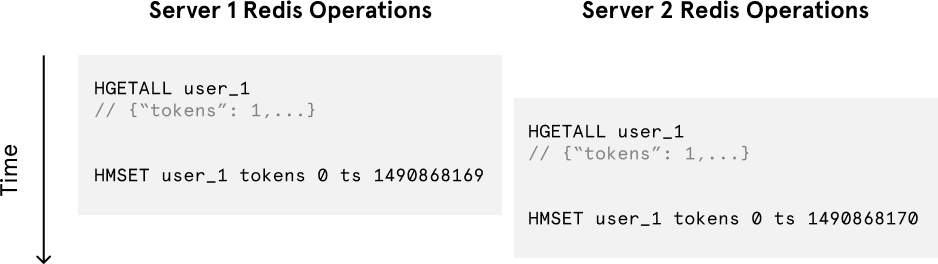
If only a single token remains and two servers’ Redis operations interleave, both requests would be let through.Imagine if there was only one available token for a user and that user issued multiple requests. If two separate processes served each of these requests and concurrently read the available token count before either of them updated it, each process would think the user had a single token left and that they had not hit the rate limit.
Our token bucket implementation could achieve atomicity if each process were to fetch a Redis lock for the duration of its Redis operations. This, however, would come at the expense of slowing down concurrent requests from the same user and introducing another layer of complexity. Alternatively, we could make the token bucket’s Redis operations atomic via Lua scripting.
Pros:
-
Token Bucket technique allows for occasional bursts of traffic.
A request goes through as long as there are tokens left. This is super important since traffic burst is not uncommon. One example is events like Amazon Prime Day when traffic spikes for a certain time period.
-
Token Bucket algorithm is very memory efficient.
Cons:
-
May be more complex to implement, especially in a distributed system.
-
A race condition, as described above,
may cause an issue in a distributed system due to concurrent requests from the same user. We have discussed above how to avoid
this situation.
Which internet companies use Token Bucket for their rate limiting?
-
In the below example, there is a limit of 3 requests per minute per user.
-
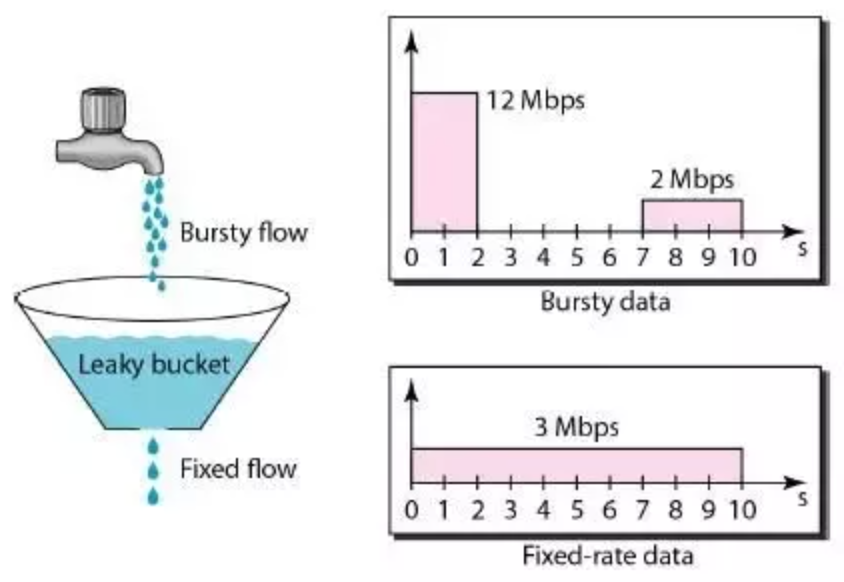
Leaky Bucket algorithm
Similar to the token bucket, leaky bucket also has a bucket with a finite capacity for each client. However, instead of tokens, it is filled with requests from that client. Requests are taken out of the bucket and processed at a constant rate. If the rate at which requests arrive is greater than the rate at which requests are processed, the bucket will fill up and further requests will be dropped until there is space in the bucket.
The following image perfectly illustrates the leaky bucket algorithm.

The image shows the usage of leaky bucket algorithm in traffic shaping. If we map it our limiting requests to server use case, water drops from the faucets are the requests, the bucket is the request queue and the water drops leaked from the bucket are the responses. Just as the water dropping to a full bucket will overflow, the requests arrive after the queue becomes full will be rejected.
As we can see, in the leaky bucket algorithm, the requests are processed at an approximately constant rate, which smooths out bursts of requests. Even though the incoming requests can be bursty, the outgoing responses are always at a same rate as shown below.
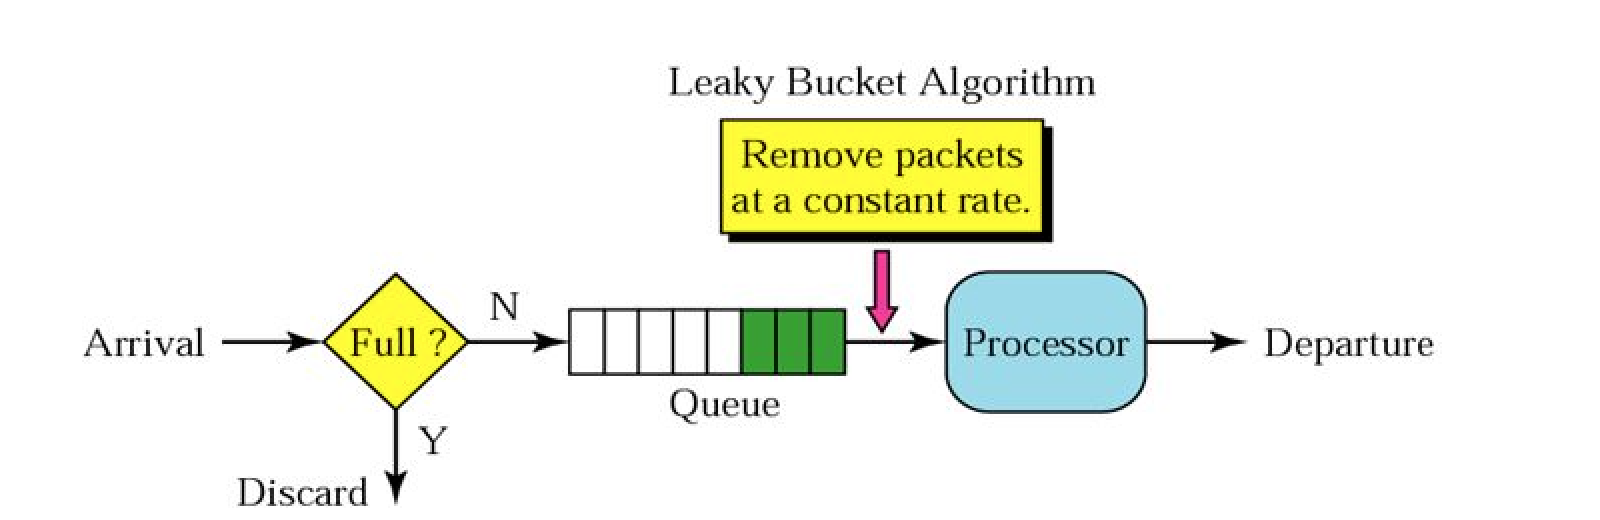
In this algorithm, we use limited sized queue and process requests at a constant rate from queue in First-In-First-Out(FIFO) manner.
For each request a user makes,-
Check if the queue limit is exceeded.
-
If the queue limit has exceeded, the request is dropped.
-
Otherwise, we add requests to queue end and handle the incoming request.
The above described process is shown in diagram below.
Just like in Token Bucket, we will use cache, for example Redis, in Leaky Bucket as well.
Code:
// RateLimitUsingLeakyBucket .
func RateLimitUsingLeakyBucket(
        userID string,
        uniqueRequestID string,
        intervalInSeconds int64,
        maximumRequests int64) bool {

	// userID can be apikey, location, ip
	requestCount := redisClient.LLen(ctx, userID).Val()

	if requestCount >= maximumRequests {
		// drop request
		return false
	}

	// add request id to the end of request queue
	redisClient.RPush(ctx, userID, uniqueRequestID)

	return true
}
In Leaky Bucket algorithm bucket size is equal to the queue size. The queue holds the requests to be processed at a fixed rate.
Pros:
-
Memory efficient given the limited queue size.
-
Smooths out traffic effectively, preventing bursts.
Requests are processed at a fixed rate, therefore it is suitable for use cases where a stable outflow rate is required.
Cons:
-
A burst of traffic fills up the queue with old requests, and if
they are not processed in time, recent requests will be rate limited.
Can lead to high rejection rates if the traffic is naturally bursty.
Which internet companies use Token Bucket for their rate limiting?
-
Check if the queue limit is exceeded.
-
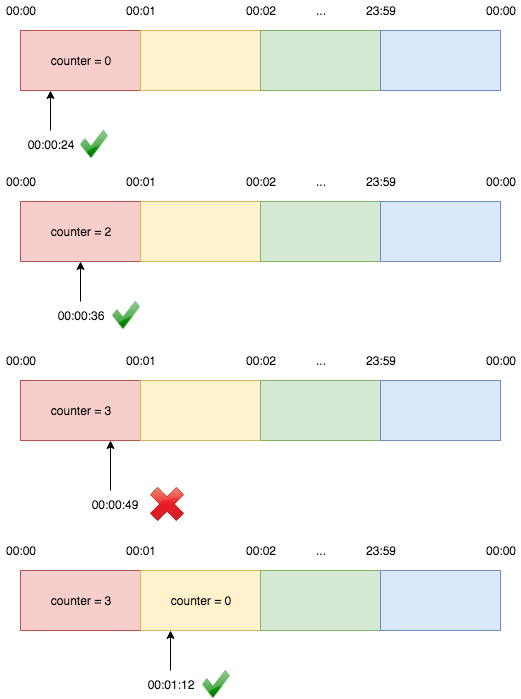
Fixed Window Counter algorithm
Fixed window is one of the most basic rate limiting mechanisms and probably the simplest technique for implementing rate limiting.
We keep a counter for a given duration of time, and keep incrementing it for every request we get. Once the limit is reached, we drop all further requests till the time duration is reset.
Below two images illustrates how it works when the limit is 3 requests per minute:
1sr representation:
2nd representation:
Fixed window counter algorithm divides the timeline into fixed-size windows and assign a counter to each window. Each request, based on its arriving time, is mapped to a window. If the counter in the window has reached the limit, requests falling in this window should be rejected. For example, if we set the window size to 1 minute. Then the windows are [00:00, 00:01), [00:01, 00:02), ...[23:59, 00:00). Suppose the limit is 2 requests per minute:
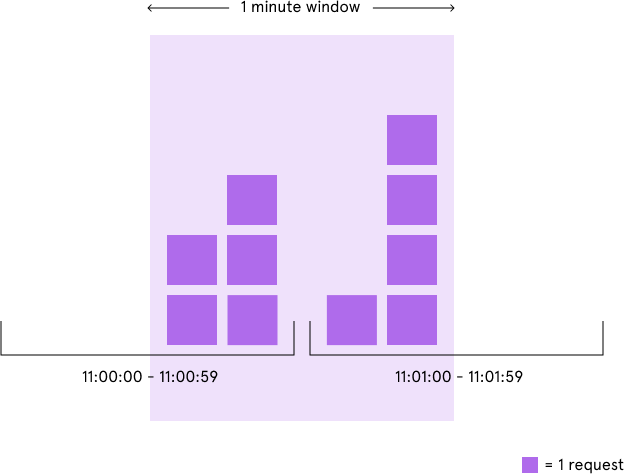
The advantage here is that it ensures that most recent requests are served without being starved by old requests. However, there is a major problem with this algorithm. Although the fixed window approach offers a straightforward mental model, it can sometimes let through twice the number of allowed requests per minute. For example, if our rate limit were 5 requests per minute and a user made 5 requests at 11:00:59, they could make 5 more requests at 11:01:00 because a new counter begins at the start of each minute. Despite a rate limit of 5 requests per minute, we’ve now allowed 10 requests in less than one minute!
We could avoid this issue by adding another rate limit with a smaller threshold and shorter enforcement window — e.g. 2 requests per second in addition to 5 requests per minute — but this would overcomplicate the rate limit. Arguably, it would also impose too severe of a restriction on how often the user could make requests.
Implementation
Unlike the token bucket algorithm, this approach’s Redis operations are atomic. Each request would increment a Redis key that included the request’s timestamp. A given Redis key might look like this:
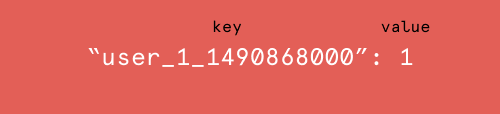
The above indicates that User 1 has made 1 request between 10:00:00 AM GMT and 10:00:59 GMT on Thursday, March 30, 2017. Notice that in Redis key contains timestamp for 10:00:00 AM GMT on Thursday, March 30, 2017 for all entries in between 10:00:00 AM GMT and 10:00:59 GMT on Thursday, March 30, 2017. For example, Redis key for requests made at 10:00:10 AM GMT, March 30, 2017 and 10:00:20 AM GMT, March 30, 2017 will both timestamp for 10:00:00 AM GMT, March 30, 2017. This is what makes the Redis operation atomic.
When incrementing the request count for a given timestamp, we would compare its value to our rate limit to decide whether to reject the request. We would also tell Redis to expire the key when the current minute passed to ensure that stale counters didn’t stick around forever.
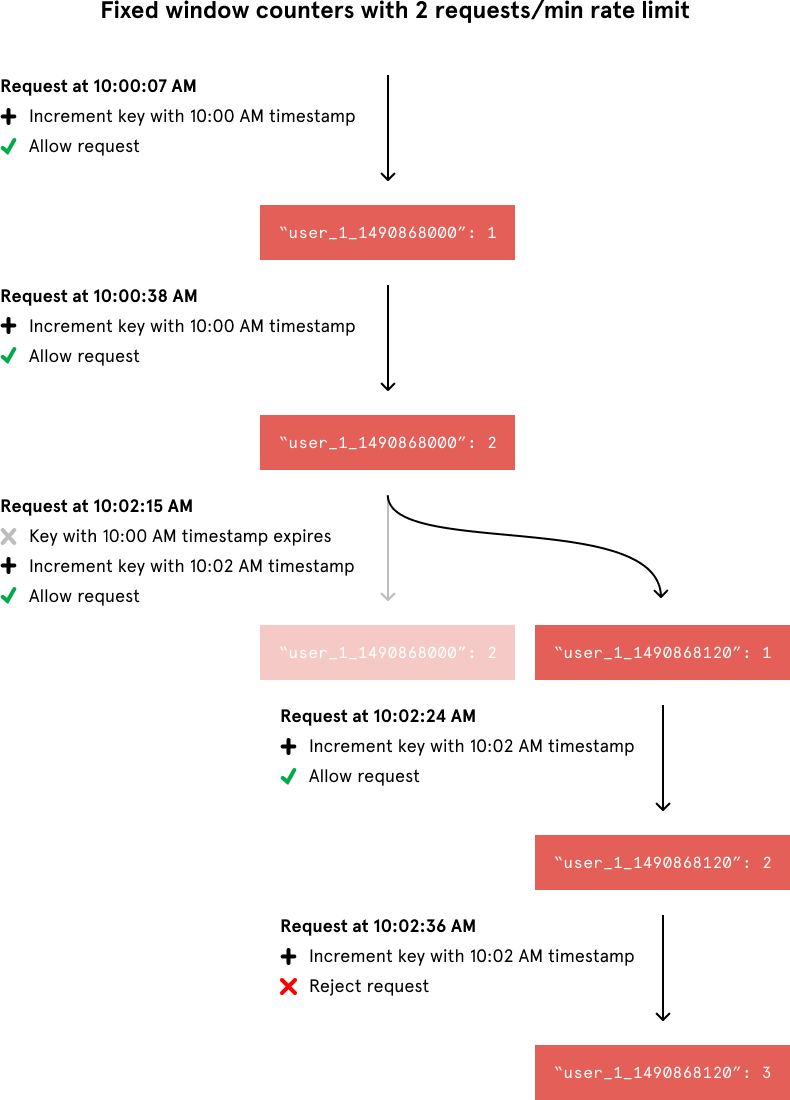
In the below example, from the top, requests 1–3 belong to window 1, hence tracked against the same key in Redis (e.g. 12345_21042020_10:00:00 or 12345_1587463200 using epoch). Since there are only 3 requests in this window, no request is blocked.
Algorithm:
For each request a user makes,-
Check if the user has exceeded the limit in the current window.
-
If the user has exceeded the limit, the request is dropped
- Otherwise, we increment the counter
// RateLimitUsingFixedWindow .
func RateLimitUsingFixedWindow(userID string, intervalInSeconds int64, maximumRequests int64) bool {
	// userID can be apikey, location, ip
	currentWindow := strconv.FormatInt(time.Now().Unix()/intervalInSeconds, 10)
	key := userID + ":" + currentWindow // user userID + current time window
	// get current window count
	value, _ := redisClient.Get(ctx, key).Result()
	requestCount, _ := strconv.ParseInt(value, 10, 64)
	if requestCount >= maximumRequests {
		// drop request
		return false
	}

	// increment request count by 1
	redisClient.Incr(ctx, key) // if the key is not available, value is initialised to 0 and incremented to 1

	// handle request
	return true
	// delete all expired keys at regular intervals
}
At regular intervals, say every 10 min or every hour, delete all the expired window keys (instead of setting the current window to expire at the start next window using EXPIRE command in Redis, which is another command/load on Redis for every request).
Pros:
- Simple and easy to implement.
-
Memory efficient.
-
Easy to understand.
-
Best for use cases where quota is reset only at the end of the unit time window.
For example: if the limit is 10 requests / min,
it allows 10 requests in every unit minute window say from 10:00:00 AM to 10:00:59 AM, and the quota
resets at 10:01:00 AM. It does not matter if 20 requests were allowed in between 10:00:30 AM
and 10:01:29 AM, since
10:00:00 AM to 10:00:59 AM is one slot and
10:01:00 AM to 10:01:59 AM is another slot, even though 20 requests we allowed in last one minute at 10:01:30 AM.
This is why this algorithm is called Fixed Window and not Sliding Window.
Cons:
-
Allows bursty traffic at the edge of windows, which could overload the system.
Spike in traffic at the edge of a window makes this algorithm unsuitable for use cases where time window needs to be tracked real-time at all given time.
Example 1: if we set a maximum of 10 message per minute, we don’t want a user to be able to receive 10 messages at 0:59 and 10 more messages at 1:01.
Example 2: if the limit is 10 requests / min and 10 requests were sent starting from 10:00:30 AM to 10:00:59 AM, then no requests will be allowed till 10:01:29 AM and quota will be reset only at 10:01:29 AM since 10 requests were already sent in last 1 min starting at 10:00:30 AM.
-
Check if the user has exceeded the limit in the current window.
-
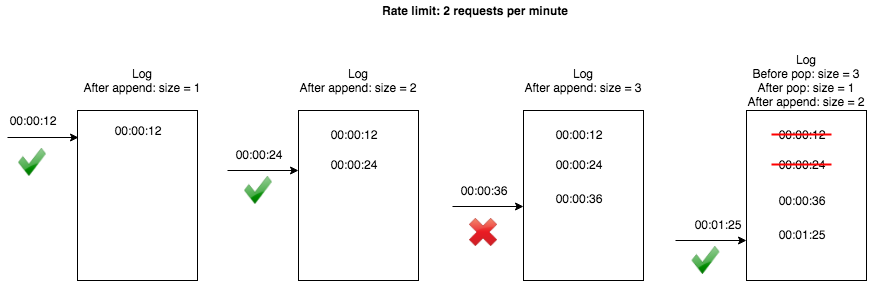
Sliding Window Logs algorithm
As discussed above, the fixed window counter algorithm has a major drawback: it allows more requests to go through at the edge of a window. The sliding window logs algorithms fixes this issue. It works as follows:
-
The algorithm keeps track of request timestamps. Timestamp data
is usually kept in cache, such as
sorted sets of Redis
.
-
When a new request comes in, remove all the outdated timestamps. Outdated timestamps are defined
as those
older than the start of the current time window.
Storing the timestamps in sorted order in sorted set enables us to efficiently find the outdated timestamps. -
Add timestamp of the new request to the log.
-
If the log size is the same or lower than the allowed count, a request is accepted. Otherwise, it is rejected.
Let's see this algorithm in action below:
Implementation:
Whenever request arrives, Sliding Window Logs algorithm would insert a new member into the sorted set with a sort value of the Unix microsecond timestamp. This would allow us to efficiently remove all of the set’s members with outdated timestamps and count the size of the set afterward. The sorted set’s size would then be equal to the number of requests in the most recent sliding window of time.
Algorithm:
For each request a user makes,
-
Check if the user has exceeded the limit in the current window by getting the count of all the logs in the last window in the sorted set. If current time is 10:00:27 and rate is 100 req/min, get logs from previous window(10:00:27–60= 09:59:28) to current time(10:00:27).
-
If the user has exceeded the limit, the request is dropped.
-
Otherwise, we add the unique request ID (you can get from the request or you can generate a unique hash with userID and time) to the sorted sets(sorted by time).
For people familiar with Redis, below is how we can implement the above algorithm:
// RateLimitUsingSlidingLogs .
func RateLimitUsingSlidingLogs(userID string, uniqueRequestID string, intervalInSeconds int64, maximumRequests int64) bool {
	// userID can be apikey, location, ip
	currentTime := strconv.FormatInt(time.Now().Unix(), 10)
	lastWindowTime := strconv.FormatInt(time.Now().Unix()-intervalInSeconds, 10)
	// get current window count
	requestCount := redisClient.ZCount(ctx, userID, lastWindowTime, currentTime).Val()
	if requestCount >= maximumRequests {
		// drop request
		return false
	}

	// add request id to last window
	redisClient.ZAdd(ctx, userID, &redis.Z{Score: float64(time.Now().Unix()), Member: uniqueRequestID}) // add unique request id to userID set with score as current time

	// handle request
	return true
	// remove all expired request ids at regular intervals using ZRemRangeByScore from -inf to last window time
}
Below is what the above code does:
For each request (assuming 1 min rate-limiting window):-
Remove elements from the set which are older than 1 min using ZRemRangeByScore. This leaves only elements (requests) that occurred in the last 1 minute.
-
Add current request timestamp using ZAdd.
-
Fetch all elements of the set using ZRange(0, -1) and check the count against rate-limit value and accept/reject the request accordingly.
-
Update sorted set TTL with each update so that it’s cleaned up after being idle for some time.
All of these operations can be performed atomically using MULTI command, so this rate limiter can be shared by multiple processes.
We need to be careful while choosing the timestamp granularity (second, millisecond, microsecond). Sorted set, being a set, doesn’t allow duplicates. So if we get multiple requests at the same timestamp, they will be counted as one.
Pros:
Sliding Window Logs algorithm works flawlessly. Rate limiting implemented by this algorithm is very accurate. In rolling window, requests will not exceed the rate limit.
It smoothes out bursty traffic.
Cons:
Requires more storage and computational resources because it keeps a log of all requests.
-
The algorithm keeps track of request timestamps. Timestamp data
is usually kept in cache, such as
sorted sets of Redis
.
-
Sliding Window Counter algorithm
The Sliding Window Counter algorithm is a hybrid approach that combines the Fixed Window Counter algorithm and Sliding Window Logs algorithm.
This algorithm is often used to stop the spammers very efficiently.
Sliding Window Counter algorithm can be implemented by two different approaches as described below:
-
Approach #1:
Let's take an example: Say we are building a rate limiter of 100 requests/hour. Say a bucket size of 20 mins is chosen, then there are 3 buckets in the unit time.
For a window time of 2AM to 3AM, the buckets are
{
 "2AM-2:20AM": 10,
 "2:20AM-2:40AM": 20,
 "2:40AM-3:00AM": 30
}
If a request is received at 2:50AM, we find out the total requests in last 3 buckets including the current and add them, in this case they sum upto 60 (<100), so a new request is added to the bucket of 2:40AM – 3:00AM giving below:
{
 "2AM-2:20AM": 10,
 "2:20AM-2:40AM": 20,
 "2:40AM-3:00AM": 31
}
-
Approach #2
In the sliding window counter algorithm, instead of fixed window size, we have a rolling window of time to smooth bursts.
The windows are typically defined by the floor of the current timestamp, so 12:03:15 with a 60-second window length would be in the 12:03:00 window.
Let’s say we want to limit 100 requests per hour on an API and assume there are 84 requests in the time window [12:00–1:00) and 36 requests current window [1:00 to 2:00) which started 15 minutes ago.
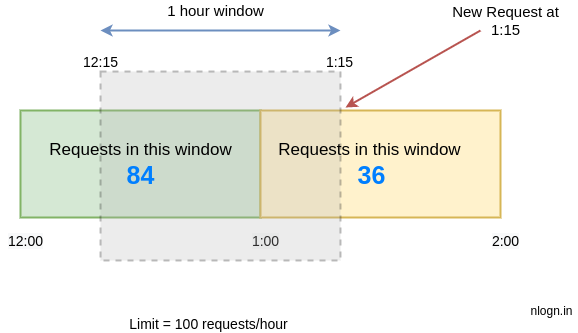
Now imagine a new request arrives at 1:15. To decide, whether we should accept this request or deny it will be based on the approximation.
The approximation rate will be calculated like this:
    limit = 100 requests/hour

    rate = ( 84 * ((time interval between 1:00 and 12:15) / rolling window size) ) + 36
    = 84 * ((60 - 15)/60) + 36
    = 84 * 0.75 + 36
    = 99

    rate < 100
    hence, we will accept this request.
Since the requests in the current window [12:15 – 1:15) are 99 which is less than our limit of 100 requests/hour, hence this request will be accepted. But any new request during the next second will not be accepted.
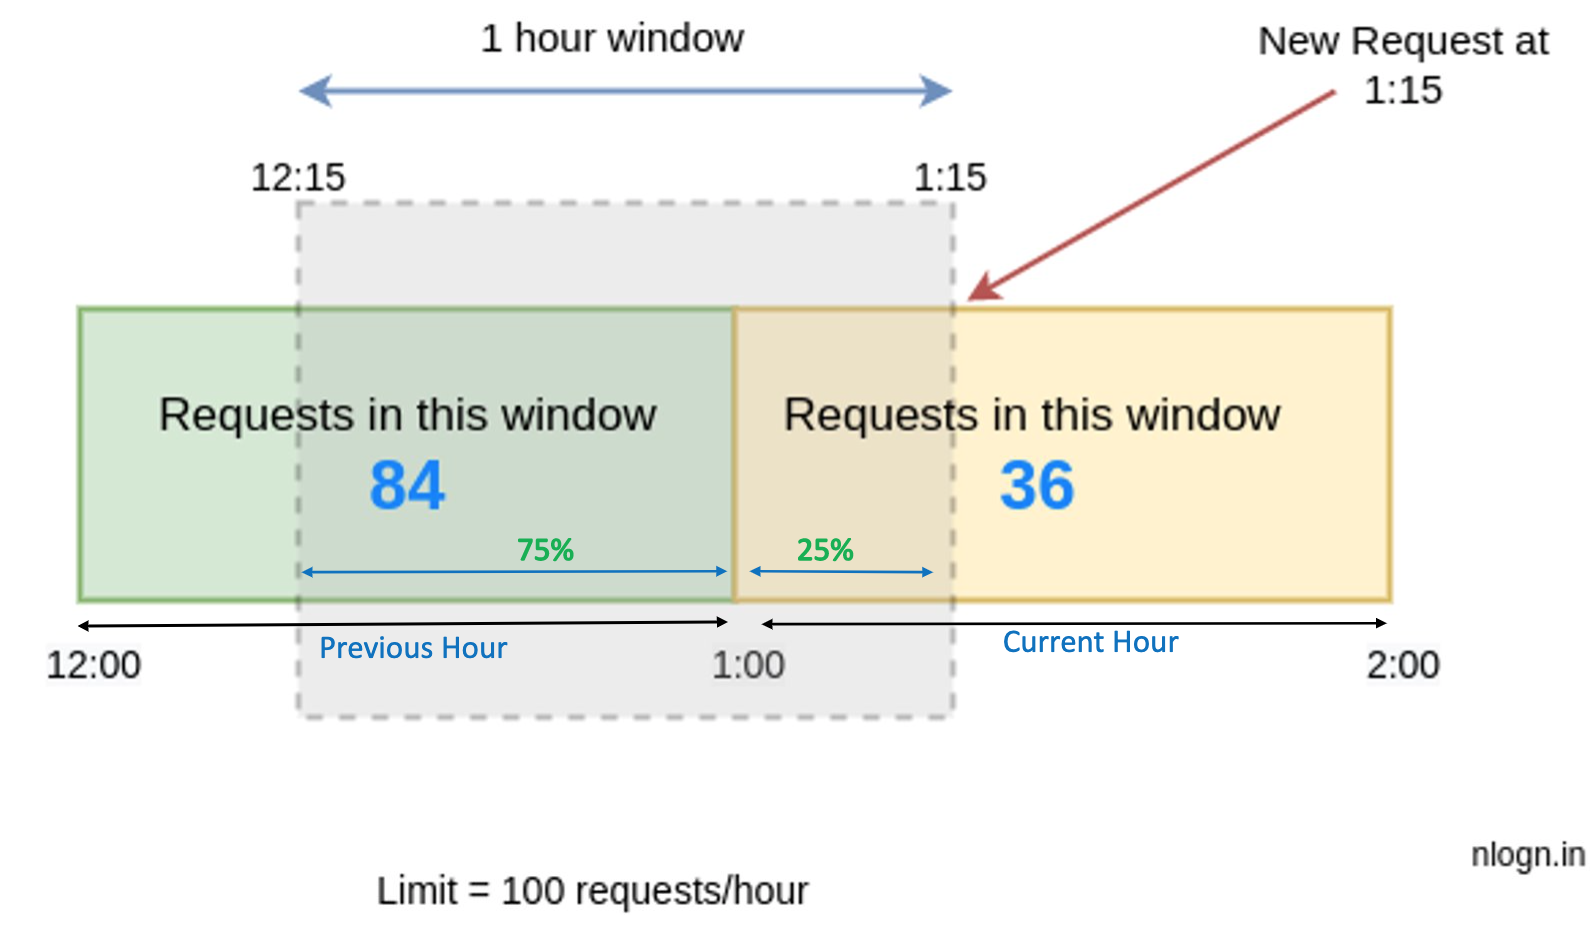
We can explain the above calculation in a more lucid way: Assume the rate limiter allows a maximum of 100 requests per hour, and there are 84 requests in the previous hour and 36 requests in the current hour. For a new request that arrives at a 25% position in the current hour, the number of requests in the rolling window is calculated using the following formula:
Requests in current window + (Requests in the previous window * overlap percentage of the rolling window and previous window)
Using the above formula, we get (36 + (84 * 75%)) = 99
Since the rate limiter allows 100 requests per hour, the current request will go through.
This algorithm assumes a constant request rate in the (any) previous window, which is not true as there can be request spikes too during a minute and no request during another hour. Hence the result is only an approximated value.
// RateLimitUsingSlidingWindow .
func RateLimitUsingSlidingWindow(userID string, uniqueRequestID string, intervalInSeconds int64, maximumRequests int64) bool {
	// userID can be apikey, location, ip
	now := time.Now().Unix()

	currentWindow := strconv.FormatInt(now/intervalInSeconds, 10)
	key := userID + ":" + currentWindow // user userID + current time window
	// get current window count
	value, _ := redisClient.Get(ctx, key).Result()
	requestCountCurrentWindow, _ := strconv.ParseInt(value, 10, 64)
	if requestCountCurrentWindow >= maximumRequests {
		// drop request
		return false
	}

	lastWindow := strconv.FormatInt(((now - intervalInSeconds) / intervalInSeconds), 10)
	key = userID + ":" + lastWindow // user userID + last time window
	// get last window count
	value, _ = redisClient.Get(ctx, key).Result()
	requestCountlastWindow, _ := strconv.ParseInt(value, 10, 64)

	elapsedTimePercentage := float64(now%intervalInSeconds) / float64(intervalInSeconds)

	// last window weighted count + current window count
	if (float64(requestCountlastWindow)*(1-elapsedTimePercentage))+float64(requestCountCurrentWindow) >= float64(maximumRequests) {
		// drop request
		return false
	}

	// increment request count by 1 in current window
	redisClient.Incr(ctx, userID+":"+currentWindow)

	// handle request
	return true
}
Pros:
-
Memory efficient.
-
It smoothes out spikes in the traffic because the rate is based on the average
rate of the previous window.
Cons:
-
It only works for not-so-strict look back window.
It is an approximation of the actual rate because
it assumes requests in the previous
window are evenly distributed.
However, this problem may not be as bad as it seems. According to experiments done by Cloudflare, only 0.003% of requests are wrongly allowed or rate limited among 400 million requests.
-
Memory efficient.
-
Space Optimization
If you are using Redis, use Redis hash to optimize space. This space optimization applies to all the algorithms described above.
Overall Summary on Use Cases of different Rate Limiting algorithms:
-
Sliding Window Log approach is suitable when we have a very strict rate limiting requirement.
-
Overall, in most cases Token Bucket algorithm will be
a perfect fit if we can tolerate little bit of leniency and the requirement is that we should throttle only
when request submissions exceed the steady-state request rate and burst limits. This
algorithm is widely used in high traffic public offerings or cloud services.
A good example is:
Throttle requests to your REST APIs for better throughput in Amazon API Gateway
-
The Leaky Bucket algorithm is good for traffic shaping or
traffic policing.
The leaky bucket algorithm is primarily used to control the rate of data transmission in a network by smoothing out bursts of traffic and ensuring a constant data flow, effectively preventing sudden surges and regulating traffic to a predefined rate, similar to how a bucket with a small leak would gradually release water regardless of how quickly it's filled up; it's often applied in network traffic shaping and policing to manage bandwidth usage and protect against congestion.
NGINX uses Leaky Bucket for Rate Limiting.
Where to put the Rate Limiter ?
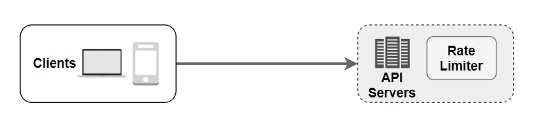
A rate limiter can be implemented on either the client or server-side.
- Client-side implementation: In general, client side is not the ideal place to implement rate limiter for most use cases, since a malicious actors can manipulate the client-side code.
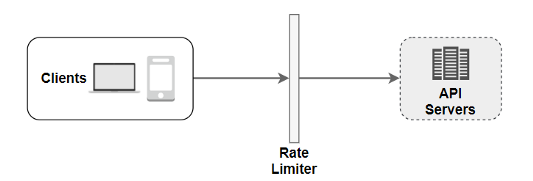
- Server-side implementation: On the server-side, a rate limiter is shown in the diagram below.
There is an alternative and much better implementation. We can construct a rate limiter middleware, which throttles requests, whenever appropriate, before the request can even hit your APIs, rather than establishing a rate limiter on the API servers, as indicated in the diagram below.
Now since we already know by now that we will be needing cache, below is a more complete architecture diagram.
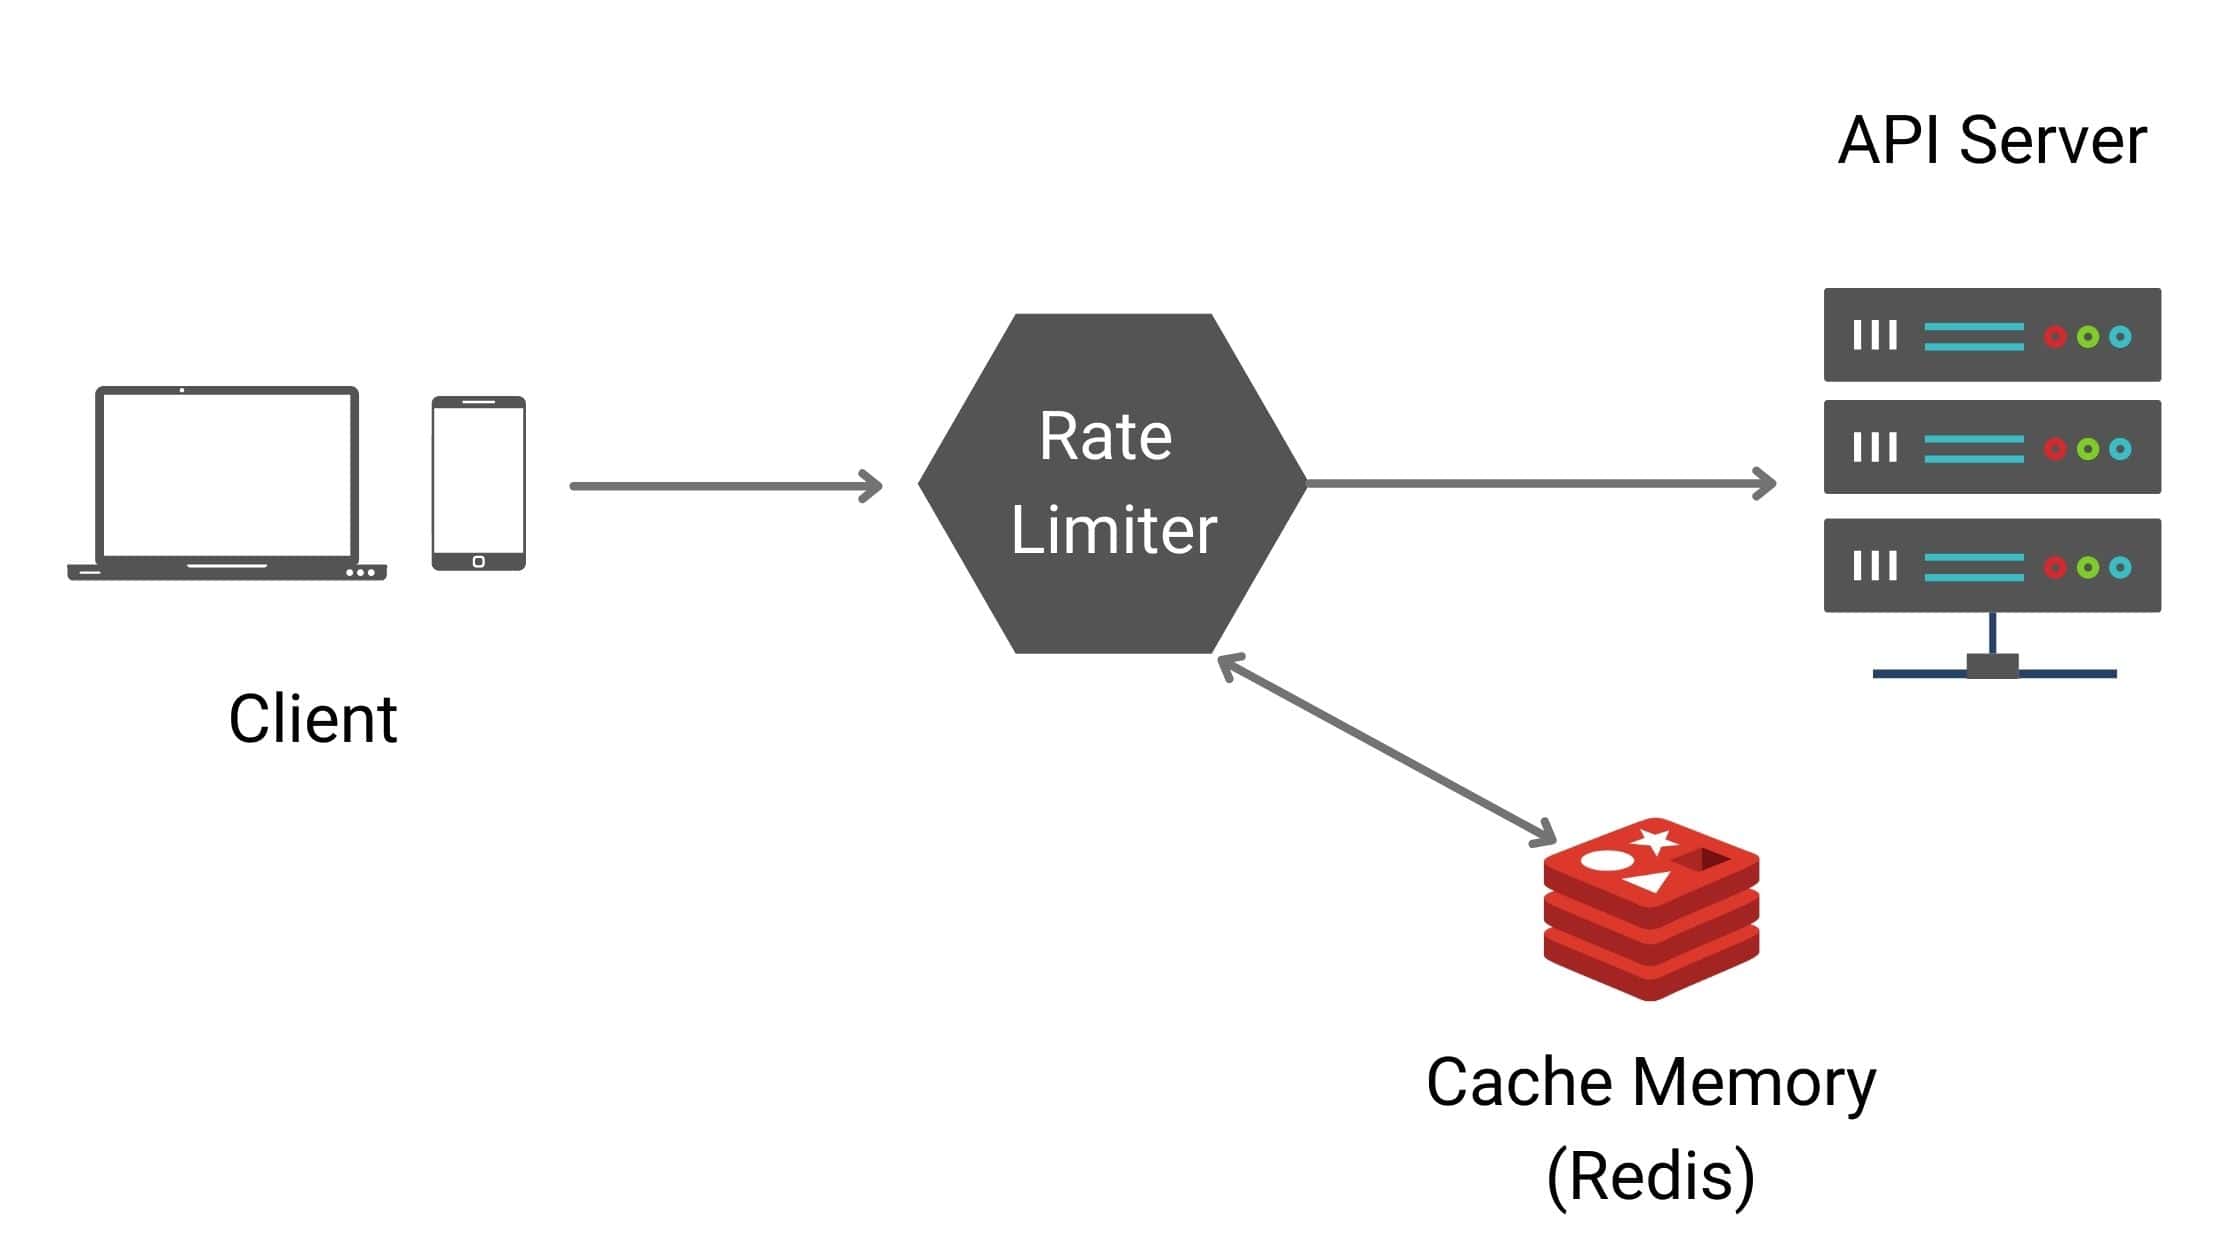
In general, having a separate rate limiter middleware is a better architecture because:
-
that way it is decoupled from the other components and microservice, for example your APIs. This helps
us to scale our rate limiter middleware independently of all other components.
-
We might have than one microservices exposing more than one APIs that we want to rate limit. In that case
we do not need to implement rate limiter for each of these microservices.
This one rate limiter middleware will be able to rate limit all the APIs.
This also avoids code duplication.

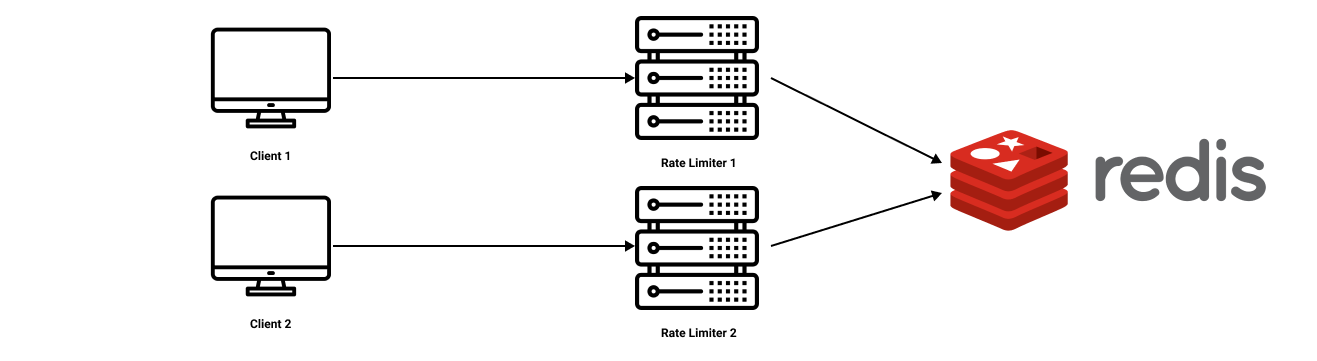
Distributed Rate Limiter
To support millions of users, one rate limiter server might not be enough to handle the traffic. When multiple rate limiter servers are used, synchronization of data becomes an overhead. How will one rate limiter server know about how much quota is left for a customer that just got served by the other rate limiter server(s) ? There are two approaches to handle this:-
One possible solution is to use Sticky Session
that allows a client to send traffic to the same rate limiter. This solution is not advisable because this design
option is neither scalable nor flexible.
-
A better approach is to use
centralized data stores like Redis.
The two main problems with this approach are:-
increased latency making requests to the data store
which is a trade-off we are making,
- race conditions(discussed below in more details).
-
increased latency making requests to the data store
which is a trade-off we are making,
Race Conditions
One of the most extensive problems with a centralized data store is the potential for race conditions in high concurrency request patterns. This issue happens when you use a naïve "get-then-set" approach, wherein you retrieve the current rate limit counter, increment it, and then push it back to the datastore. This model's problem is that additional requests can come through in the time it takes to perform a full cycle of read-increment-store, each attempting to store the increment counter with an invalid (lower) counter value. This allows a consumer to send a very high rate of requests to bypass rate limiting controls.One way to avoid this problem is to put a "lock" around the key in question, preventing any other processes from accessing or writing to the counter. A lock would quickly become a significant performance bottleneck and does not scale well, mainly when using remote servers like Redis as the backing datastore.
A better approach is to use a "set-then-get" mindset, relying on atomic operators that implement locks in a very performant fashion, allowing you to quickly increment and check counter values without letting the atomic operations get in the way.
Below is an example of atomic operators in Java:
import java.util.concurrent.atomic.AtomicInteger;

public class AtomicCounter {
    private AtomicInteger count = new AtomicInteger(0);

    public void increment() {
        count.incrementAndGet();
    }

    public int getCount() {
        return count.get();
    }
}
Monitoring:
After the rate limiter is put in place, it is important to gather analytics data to check whether the implemented rate limiter is effective. Primarily, we are interested in measuring or assessing that the rate limiting algorithm and rate limiting rules are effective and working as expected.How are most companies implement rate limiting in real-world projects?
While there are companies like Lyft, Shopify, Stripe, Amazon which implement their own rate limiter, most companies leverage rate limiting services that are already available out there, like below:-
API Gateway (
Kong,
Azure API Management
,
AWS API Gateway
, etc.)
-
Reverse Proxy like Nginx
Types of Throttling
-
Hard Throttling:
The number of API requests cannot exceed the throttle limit.
-
Soft Throttling: In this type, we can set the API request limit to exceed a certain percentage. For example, if we have rate-limit of 100 messages a minute and 10% exceed-limit, our rate limiter will allow up to 110 messages per minute.
- Elastic or Dynamic Throttling: Under Elastic throttling, the number of requests can go beyond the threshold if the system has some resources available. For example, if a user is allowed only 100 messages a minute, we can let the user send more than 100 messages a minute when there are free resources available in the system.
Few Other Things to Keep in Mind:
-
If you are consuming an API which is rate limiting,
you need to implement proper
Retry mechanism
in place. Whenever you get 429 Too Many Requests
Http Status Code in the API response
you should queue up the request to retry and process later.
Use Cases where Client-Side Rate Limiting is Necessary:
It might seem that rate limiting is solely in the API providers’ interest. In practice, the users or client of the service could also benefit from rate limiting. Clients who adhere to usage restrictions can always be assured that the service provider will fulfil their requests. If the user does not take the rate limiting into account, then they may have to face some sudden or unexpected rejection of their requests, which can affect the functionality of their solutions.For example, a mobile application might be built upon the Facebook messaging API. When people use this application, they are actually using Facebook messaging in the background. In this case, it is the client who must take steps to ensure the application adheres to the rate limiting norms. If the rate limiting is overlooked at the client-side, users of this mobile application might face unexpected errors. It is in the best interest of API users to enforce rate limiting at the client-side.
No rate limiting
It is important to consider the option of performing no rate limiting as a floor in your design—that is, as a worst-case situation that your system must be able to accommodate. Build your system with robust error handling in case some part of your rate-limiting strategy fails, and understand what users of your service will receive in those situations. Ensure that you provide useful error codes and that you don't leak any sensitive data in error codes. Using timeouts, deadlines, and circuit-breaking patterns helps your service to be more robust in the absence of rate limiting.
System Design Interview
By now you must have gained deep knowledge and understanding of rate limiting. If you were a beginner, you can safely consider yourself an intermediate-to-advanced learner now as far as designing rate limiter and similar scalable distributed planet-scale systems are concerned. We have covered all the basics as well as advanced concepts and architecture design along with some coding and implementation. Leveraging the content covered in this chapter you should be easily able to build your own version of scalable rate limiter on public cloud like Microsoft Azure, Amazon Web Services, Google Cloud Platform, Oracle Cloud Infrastructure. This is a huge advantage when you go to an interview. Most candidates go to System Interview interview with just theoretical knowledge of system design by reading about common System Design interview questions. They blurt out buzzwords without knowing how they are actually implemented, without having deep understanding of them. By the end of the interview, this eventually becomes becomes clear to the interviewer, and these candidates often end up not getting an offer for senior position. What they lack is hands-on experience and consequently knowing how systems are actually built in tech companies. I am taking a stab at bridging that gap. Click here to get started with Microsoft Azure Cloud with free credits and start building everything you learn in this course. Go through our other chapters to know more on how to build apps on Azure and other public cloud.Your practical experience and knowledge will show up eventually in your interview performance and will help you stand outside of the crowd. I want you to walk confidently into the interview room (virtual or in-person) and prove your potential and deep knowledge.
Remember what is most important in a System Design interview is to ask clarifying questions and making no assumptions. If you are making any assumptions, ask your interviewer if that assumption is valid for the system she/he has in mind for you to build.
If you are asked to design rate limiter, one of the first few questions you should ask is whether the rate limiter that your interviewer wants you to design is whether the rate limiting is done based on rolling window or fixed window, because based on that you would be able to propose the algorithms that would give efficient result.
Make sure you discuss all the trade-offs.
Also discuss how large of a traffic the system will be getting so that you can propose right scale-out strategy.